Protocol Buffers
선택적 protobuf 페이로드 검사 활성화 및 연동 방법
활성화 방법
Protocol Buffers 지원은 Dari 1.6.0 이상에서 사용할 수 있습니다. 별도 feature flag나 DariConfig 토글은 없습니다.
인터셉터를 생성하고 호출하는 시점에 선택적으로 활성화합니다:
ProtobufPayloadDecoder를 전달해 인터셉터를 생성합니다.- protobuf 요청 및 응답 메서드에 원본
ByteArray를 전달합니다.
ProtobufDariInterceptor는 DariInterceptor를 확장하므로 같은 인터셉터에서 기존 String/JSON 메서드도 계속 사용할 수 있습니다.
| 조건 | 필요 여부 | 설명 |
|---|---|---|
| Dari 1.6.0 이상 | 필요 | dari와 dari-noop 버전을 동일하게 사용 |
protobufEnabled 플래그 | 불필요 | protobuf 설정 플래그는 없음 |
| 앱의 protobuf runtime 및 generated message | 필요 | Dari는 runtime을 추가하거나 선택하지 않음 |
| 표시 문자열을 반환하는 decoder | 필요 | 알 수 없는 handler에서는 null 반환 가능 |
| Base64 | 문자열 전용 브릿지만 필요 | Dari에는 디코딩된 ByteArray를 전달 |
.proto 또는 메시지 필드 변경 | 불필요 | 기존 schema와 wire payload를 그대로 사용 |
1. protobuf 지원 인터셉터 생성
schema를 이용한 디코딩은 앱이 담당합니다. handler와 요청/응답 타입에 맞는 사람이 읽을 수 있는 문자열을 반환합니다. 가능하면 JSON을 반환하면 Dari의 Decoded 화면에서 보기 좋게 정리됩니다.
import com.easyhooon.dari.Dari
import com.easyhooon.dari.interceptor.PayloadPart.REQUEST
import com.easyhooon.dari.interceptor.PayloadPart.RESPONSE
import com.easyhooon.dari.interceptor.ProtobufDariInterceptor
import com.easyhooon.dari.interceptor.ProtobufPayloadDecoder

val interceptor: ProtobufDariInterceptor? = Dari.createInterceptor(
    tag = "OrderBridge",
    protobufDecoder = ProtobufPayloadDecoder { payload, context ->
        when (context.handlerName to context.part) {
            "createOrder" to REQUEST ->
                JsonFormat.printer().print(CreateOrderRequest.parseFrom(payload))
            "createOrder" to RESPONSE ->
                JsonFormat.printer().print(CreateOrderResponse.parseFrom(payload))
            else -> null
        }
    },
)
Raw 데이터만 검사하려면 decoder가 의도적으로 null을 반환해도 됩니다:
val interceptor = Dari.createInterceptor(
    protobufDecoder = ProtobufPayloadDecoder { _, _ -> null },
)
이 경우 Dari는 페이로드를 protobuf로 기록하고 decode 상태를 DECODER_UNAVAILABLE로 표시하며, raw preview와 원본 바이트 크기는 그대로 보존합니다.
2. 원본 바이트 캡처
기존 브릿지의 요청과 응답 처리 지점에서 Dari를 호출합니다. 캡처 전에 페이로드를 JSON으로 변환하지 않습니다.
interceptor?.onWebToAppProtobufRequest(
    handlerName = "createOrder",
    displayName = "주문 생성",
    requestId = requestId,
    requestData = requestBytes,
)

val response = CreateOrderResponse.newBuilder()
    .setOrderId("order-123")
    .build()

interceptor?.onWebToAppProtobufResponse(
    handlerName = "createOrder",
    requestId = requestId,
    responseData = response.toByteArray(),
    isSuccess = true,
)
요청과 응답을 연결하려면 동일하고 안정적인 requestId를 사용합니다. 단독 메시지 또는 fire-and-forget인 경우에만 null을 전달합니다. displayName은 선택 사항이며 안정적인 handlerName과 분리해 저장됩니다.
방향별 메서드
| 브릿지 이벤트 | Dari 메서드 |
|---|---|
| Web이 App에 요청 | onWebToAppProtobufRequest() |
| App이 Web에 응답 | onWebToAppProtobufResponse() |
| App이 Web에 요청 | onAppToWebProtobufRequest() |
| Web이 App에 응답 | onAppToWebProtobufResponse() |
handlerName, 방향 및 요청/응답 구분은 ProtobufDecodeContext를 통해 decoder에 전달되므로 요청과 응답에 서로 다른 generated type을 사용할 수 있습니다.
Base64와 브릿지 전송 방식
Base64는 protobuf나 Dari의 필수 조건이 아닙니다.
- 브릿지가 bytes를 제공하면 Dari에 바로 전달합니다.
- 문자열 전용 브릿지가 Base64를 운반하면 먼저 디코딩한 bytes를 전달합니다.
@JavascriptInterface
fun onProtobufRequest(requestId: String, base64Data: String) {
    val bytes = Base64.decode(base64Data, Base64.NO_WRAP)
    interceptor?.onWebToAppProtobufRequest(
        handlerName = "createOrder",
        requestId = requestId,
        requestData = bytes,
    )
}
Dari의 Raw 화면에 표시되는 Base64는 검사를 위해 생성된 표시 형식이며, 앱이 Base64로 페이로드를 운반했다는 의미가 아닙니다.
Dari에 표시되는 내용
REQUEST와 RESPONSE 탭에서 두 가지 보기를 제공합니다:
- Decoded: 앱이 제공한 decoder가 반환한 문자열
- Raw: 캡처한 protobuf bytes를 Hex와 Base64로 표시
Decoded와 Raw 선택은 REQUEST와 RESPONSE 탭에서 각각 제공됩니다. 따라서 브릿지 요청과 응답 모두에서 schema로 해석한 값과 실제 wire bytes를 비교할 수 있습니다.
| Decoded | Raw (Hex 및 Base64) |
|---|---|
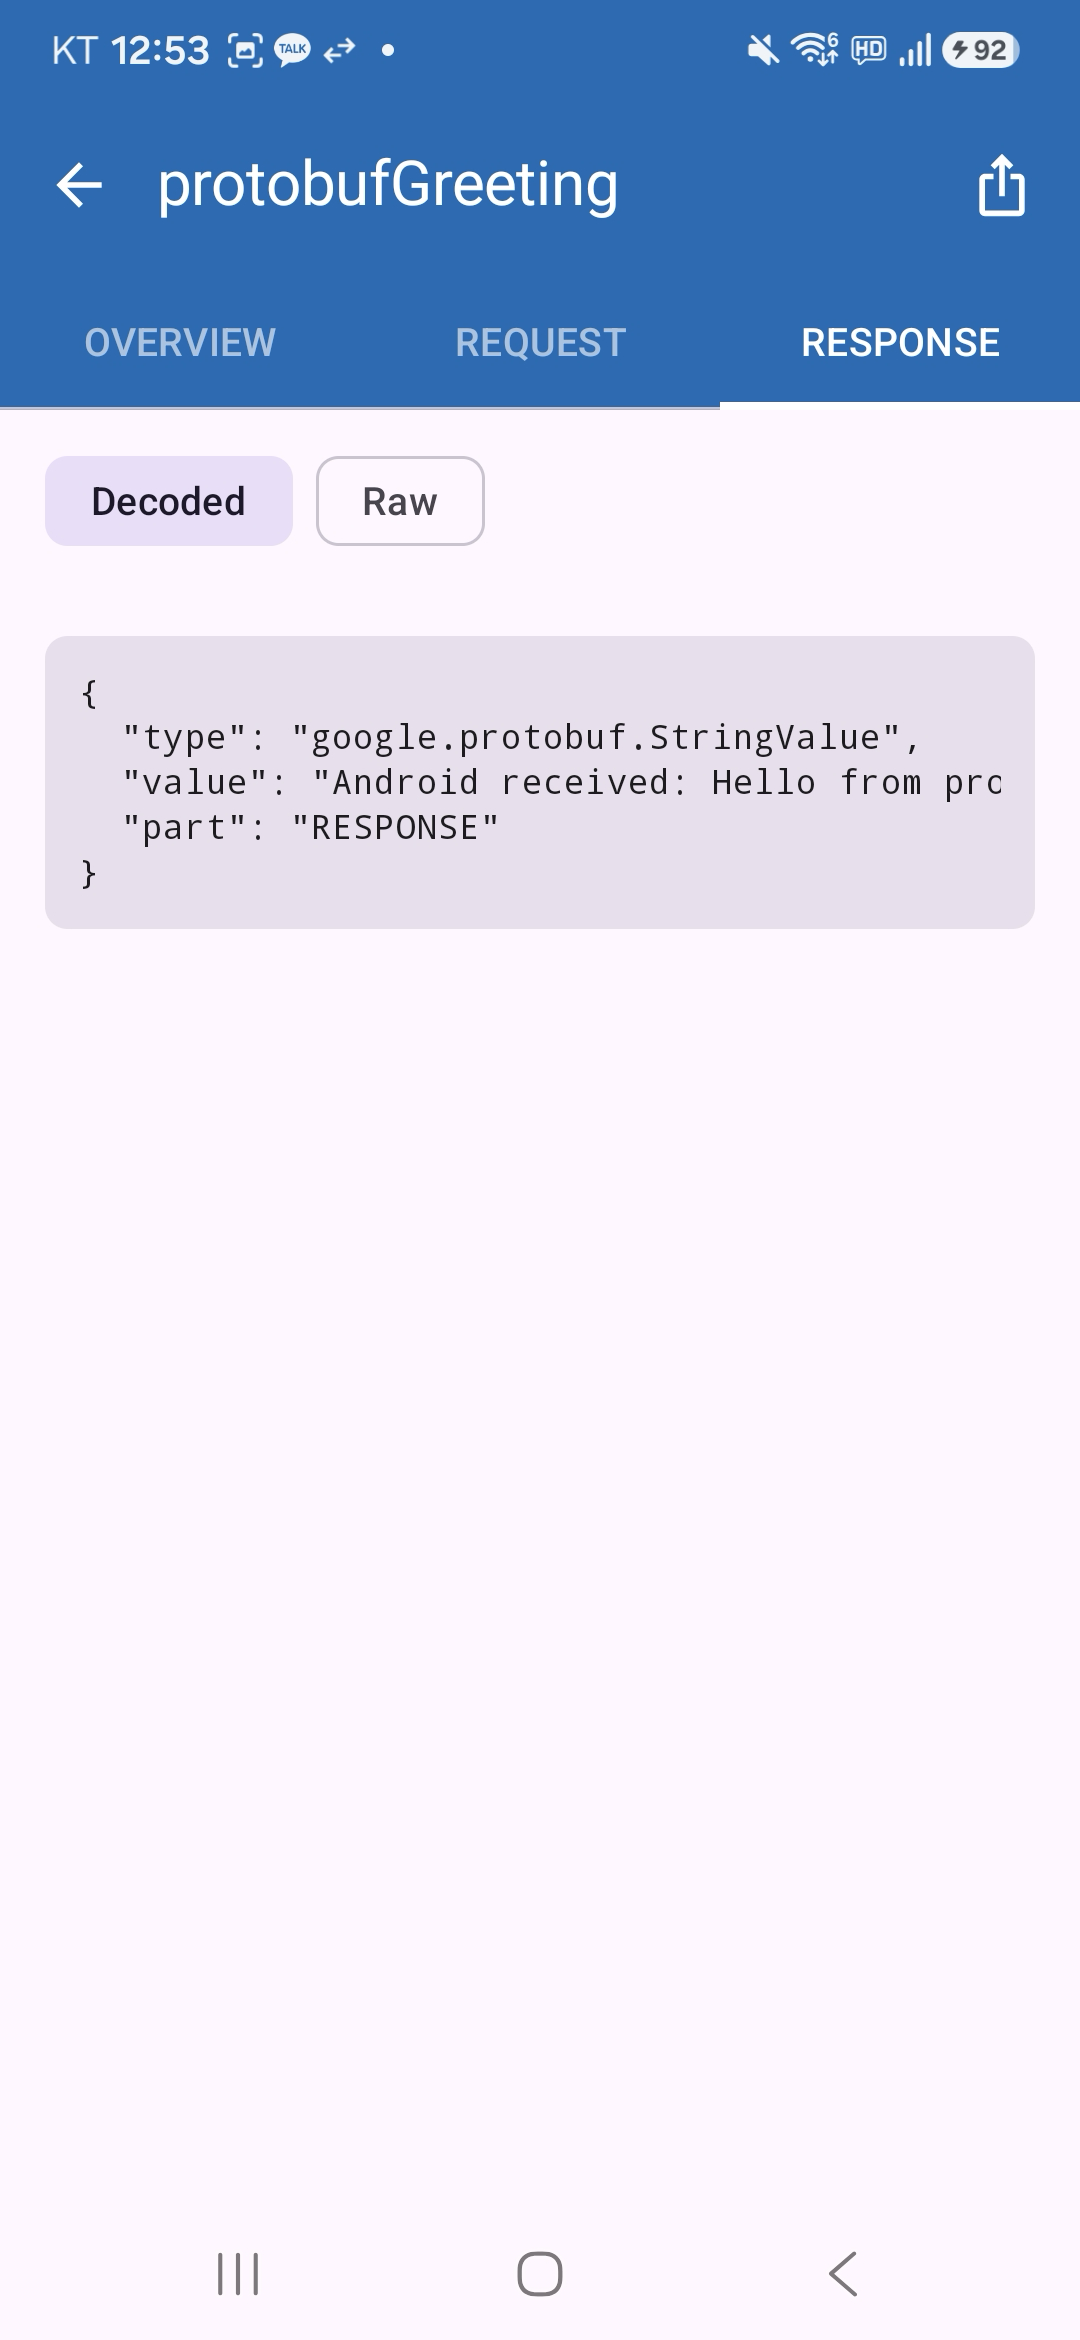 | 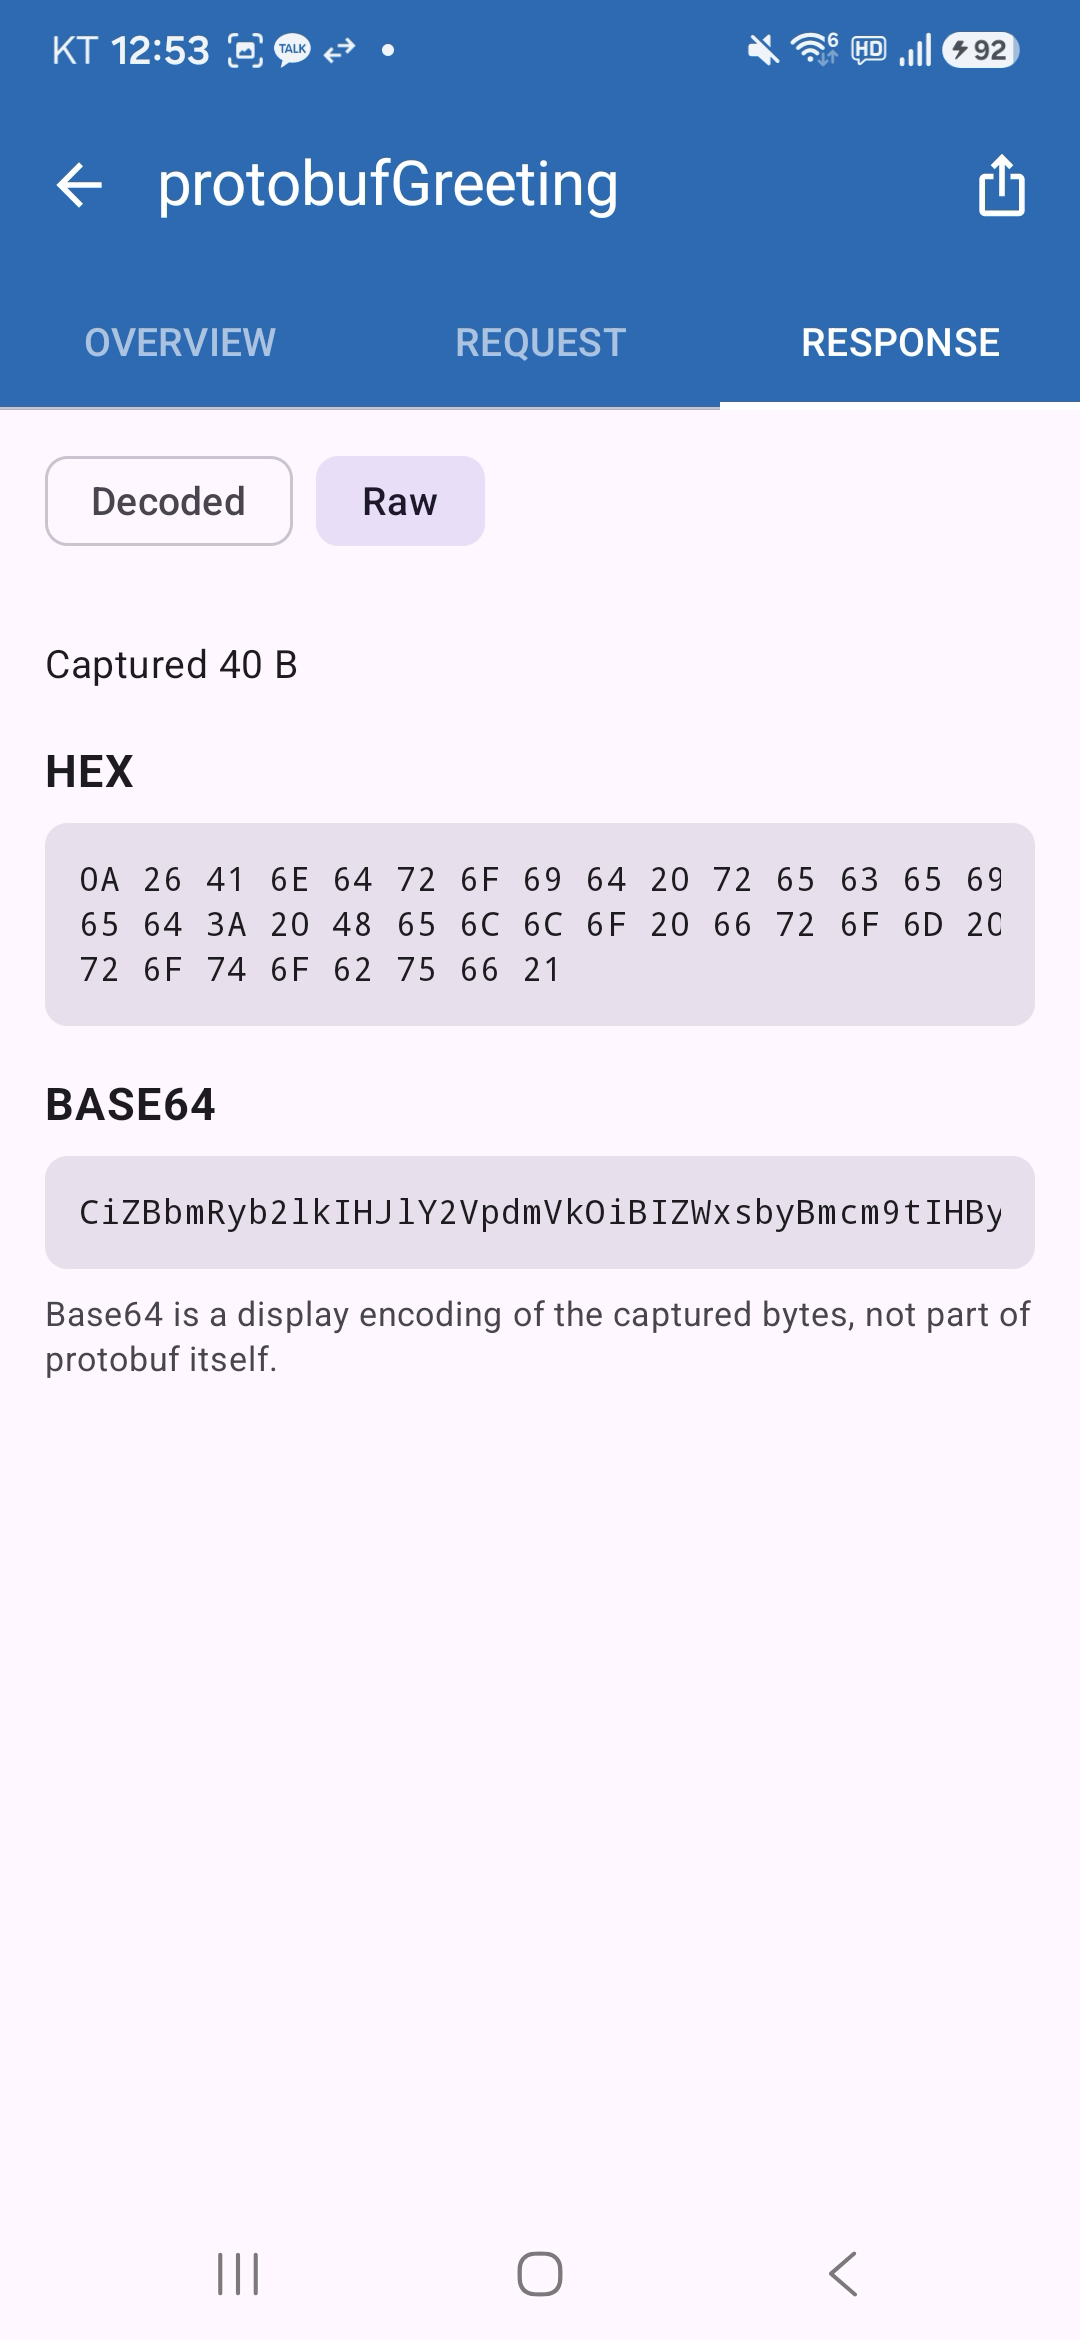 |
스크린샷은 RESPONSE 탭의 예시이며 REQUEST 탭에서도 동일한 두 가지 보기를 제공합니다. Dari는 원본 바이트 크기와 decode 상태를 기록합니다. Raw 캡처는 앞부분 최대 4KB로 제한되며, 더 큰 페이로드는 잘림 상태로 표시됩니다. 디코딩 실패는 브릿지 통신을 중단시키지 않고 기록됩니다.
런타임 동작
- 디코딩은 인터셉터 호출 스레드에서 동기 실행되므로 파싱과 표시 변환 작업을 제한해야 합니다.
- 릴리즈 빌드는
dari-noop을 사용하며Dari.createInterceptor()가null을 반환하므로 safe call에는 런타임 오버헤드가 없습니다. - 동일한 protobuf 지원 인터셉터에서 기존 String/JSON 호출을 계속 사용할 수 있습니다.